
Good mechanics are equally valuable as the electric bikes they’re working on. They know the ins and outs of every bolt they’re torquing and have an understanding of their equipment developed from years of working on it.
That said, there are some things that even the best mechanics can overlook. Knowing how to fix something is only half the battle. Knowing where to look for the problems is the other — an equally important half.
Issues Even A Good Mechanic Can Miss
Considering all the components and moving parts on an e-bike, it’s not surprising that things can go wrong. And the smallest issues are easy for a seasoned mechanic to miss. Below, we’ll run through 23 things that we’ve seen challenge even the most experienced bike guru.

1. Tubeless tires set up with sealant are the best to prevent flat tires from punctures and pinch flats. That setup loses its magic when the sealant dries up, though. Most tire sealants have a lifespan of about 60-90 days. After that, they dry up and lose all their sealing properties.

2. Removing one tire bead every few months to check the sealant is best. If it’s dried up, it’s time to replace it. Many riders insist that you can add more sealant, but we prefer removing the old stuff first. This is easily done with a rag and a little elbow grease.

3. There are many good sealants to choose from. This time we’re going to use some Monkey Goo from RedMonkey. It comes in a handy bottle that measures the sealant for you. All MTB tires should use 60-100 milliliters (2-3 ounces) of sealant. Bigger tires, like 29ers, will require more, and lightweight XC tires will require less.

4. We prefer to pour sealant directly into the tire rather than going through the valve core. Since one of the tire beads is still seated and not removed, seating this tire with a floor pump should be no problem at all. If both beads are removed, or the tire is particularly loose, a compressor may be necessary to give it a blast of air to seat the beads.

5. Suspension rocker bolts are not on the scheduled maintenance list for many mechanics, but they should be. These buggers can come loose and fall out easily. If that happens on a ride, you’re walking home. Be sure to put a torque wrench on them every month or so to be sure they are tight. Most new bikes have torque ratings laser-etched right on the bolt to simplify the process.

6. Cables should always be capped, but a mechanic occasionally forgets this last step when replacing a cable. As a result, your cable could end up looking like this after only one ride.

7. All cables (except Campy road cables) are wound clockwise. Usually, you can “unfray” a cable by simply twisting it clockwise with your fingers. If the cable has been frayed for a while, this may be futile.

8. Our frayed cable was also cut too long, so we could save it by winding the top portion and cutting the bottom portion off. Cables should be cut no longer than an inch from the cable anchor bolt. The cut should be made with a sharp pair of cable cutters to prevent further fraying.

9. There are many types of cable caps out there, and we prefer the smallest ones available. They not only seem to hold the cable better but also look more slick.

10. Put your sharp pair of cable cutters aside when installing the cable crimp. Those will likely cut right through and leave you with another frayed cable. Instead, use a pair of side cutters, and crimp the cable end with one to three lines, firm enough to hold it in place.

11. Many beginner mechanics make the mistake of greasing everything when they build a bike. This is a mistake. Certain places need friction to work properly. The steerer tube (the place where your stem clamps to the fork) is a good example. This should be clean and dry when the stem is installed. Grease here could make it easier for your stem to slip, causing a nasty crash.

12. Many bikes come with very long steerer tubes when they are new. This is to allow riders to custom-dial in their bar height to fit. Some mechanics will neglect to cut the excess steerer tube on top of the stem once the desired fit is found. This leaves a nasty stack of spacers that can hurt in the event of a crash. (We call these “sternum crackers.”) If you’re not planning on changing your stem height, cut the excess and reduce the number of spacers.

13. Stem bolts should always be torqued equally. However, some stems require the upper or lower bolts to be bottomed out before the other side is tightened. Most stems have etching on them to indicate if they work this way.

14. To dial in your cockpit, measure the distance between the brake lever and grip, and match it on the other side. You can also use a digital angle finder app on your phone to dial in the angle of the levers and shifter. A symmetrical cockpit feels better and more familiar.

15. Many mechanics align brake calipers by holding the brake and tightening the bolts. This usually works well enough. If you really want to do the job right, you should use the little window on the top of the brake caliper to align your brakes. Simply loosen the bolts, align the caliper so that daylight is on both sides of the rotor, and then snug the bolts. Be very careful if working on a brake with a spinning wheel. Brake rotors have been known to cause some nasty finger gashes.

16. You can easily check the alignment of a derailleur by standing behind it and comparing it to the cassette cogs. A bent derailleur can be spotted when the lower pulley looks bent toward the wheel. This can usually be remedied by realigning the hanger. If that doesn’t help, you may need a new derailleur, but at least those “ghost shifts” will disappear.

17. Some mechanics will use a single rag when working on a bike, but this is a mistake. Grease and grime from the rest of the bike can contaminate sensitive components like brake rotors and pads. When working on these, using a clean, lint-free rag or a paper towel is far better.

18. This poor rider has his axle quick-release in a place where it could snag a rock, possibly open up, and cause a nasty crash.

19. Axle quick releases should be positioned where they’re least likely to snag an obstacle. We prefer to run them up and slightly forward like so. If your axle does not tighten properly in this position, it may need to be “clocked.” Check your fork’s owner manual for instructions to do this.

20. The best mechanics love using zip-ties; when they do, they ensure they are all facing the same direction. They also ensure the ends are clipped clean and flush with the head. While running sloppy zip-ties may not be a safety issue, running them clean and aligned shows you care about your bike. We like to use a pair of flush-cut pliers or a pair of fingernail clippers to take care of the ends.

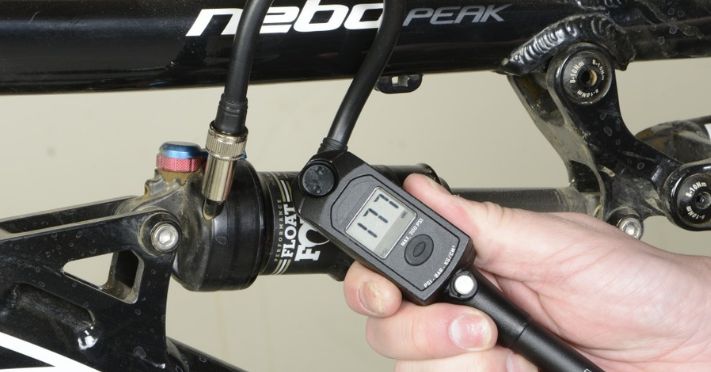
21. Every suspension design is different. That means the old advice to “just put your body weight” in the shock is completely wrong. Every bike requires a different pressure to work properly, and the linkage, leverage ratio, shock valving, etc., determine that. However, there is one fool-proof method to setting up suspension properly: put the shock in the “open” mode and then set the sag. For most bikes, this will mean it will sit through about 20-30% of its travel with your body weight on the bike in the riding position.

22. Pedal cleat bolts love to come loose, so it’s best to use a thread-locking compound on them rather than grease. This will prevent them from coming out unexpectedly and allow you to remove them easily when needed.
23. Before working on any part of your bike, it’s always a great idea to use your smartphone to take a picture of the area you’re working on. Whether it’s a factory-routed cable or the orientation of a bearing, it’s always great to have a photo to look back on so you can “put it back to stock.”
Ready to get more out of your e-bike? Check out our guide to maximizing your electric bike’s range and more accessories to enhance your rides.
